Hybrid Quilt Block Tutorial
I had seen Little Miss Shabby’s Liberated Wedding Ring quilt and loved it.
I had seen the Urban Lattice Quilt and loved it.
I wanted to see these two quilts combined into one, like a quilt Hybrid. So, I came up with this design.
So, I decided to share a tutorial with you, so you can make one yourself.
Fabric Requirements:
-You will need about 6 charms packs of your choice, or 20-24 fat quarters (It is better to have more than less)
-You will need at least 3 yards of a solid background fabric of your choice. You might need more depending on which way you cut your trapezoids (if you cut it the easy way, but with lots of waste, you’ll need exactly 3 3/4 yard fabric.)
Tools:
Ruler, at least 18 inches long
Rotary Cutter and cutting board
sharpened pencils
glue stick
48 sheets of scrapbook paper
Paper Piecing Preparation:
I used 48 sheets of 12-inch x 12-inch scrapbook paper to piece my blocks. Sadly, not all scrapbook paper is made the same size, so either make sure all of your paper is the same size or cut them all the same as the smallest size. It is more important than all the paper is the same size, even if it is not exactly 12 x 12.
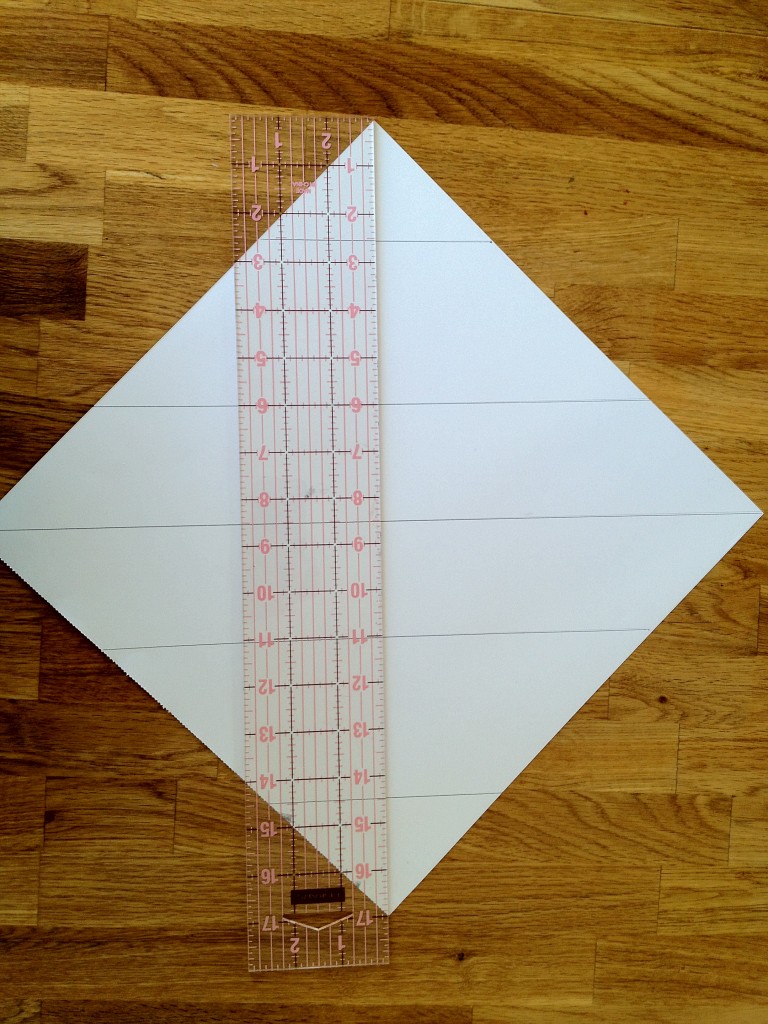
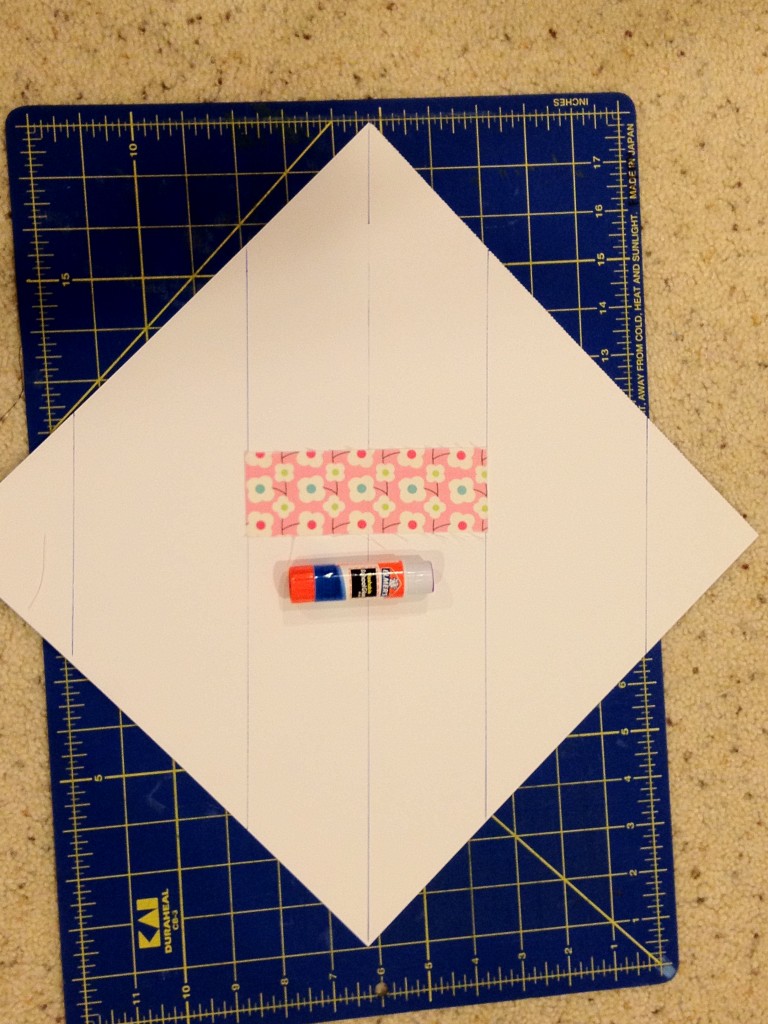
I drew the lines in this way.
1) I marked from corner to opposite corner down the midline of the paper. This is the line from which my other measurements will be made. I will not be using this line for any other reason.
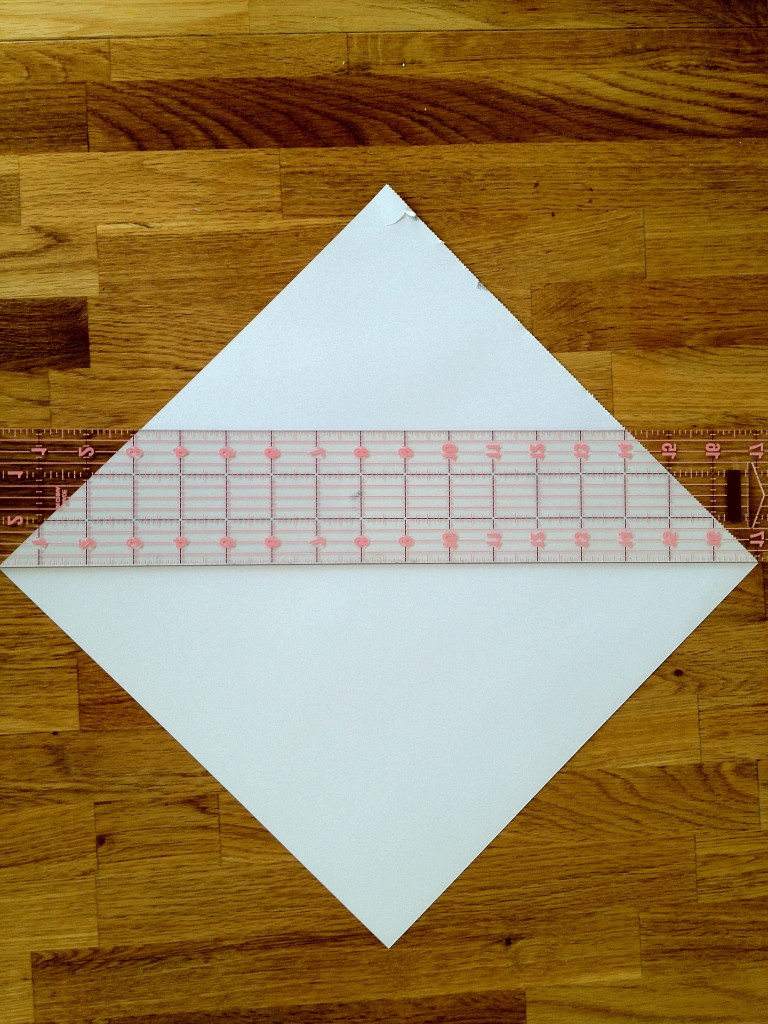
2) The next line I drew is 2 1/2 inches from the midline mark. The pen in the picture below is showing where my midline is located.
3) Again using the midline as my guide, I drew another line 2 1/2 inches away on the opposite side. These lines will not be sewing lines. Rather, they will be fabric placement guides.
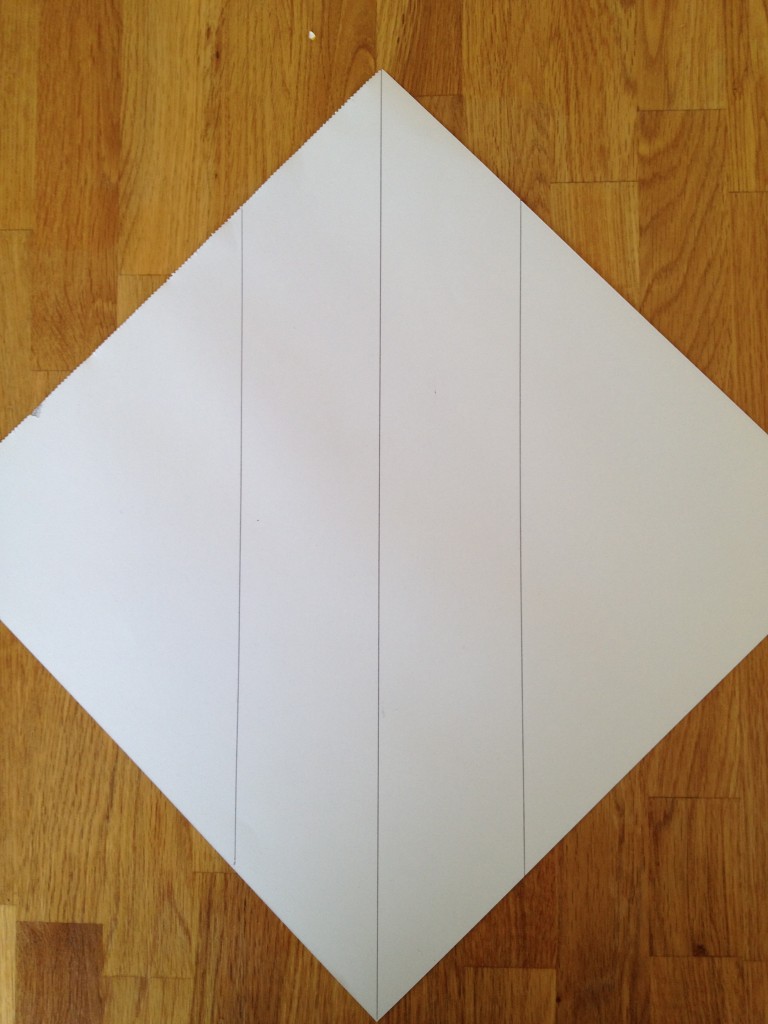
Your paper should now look like this.
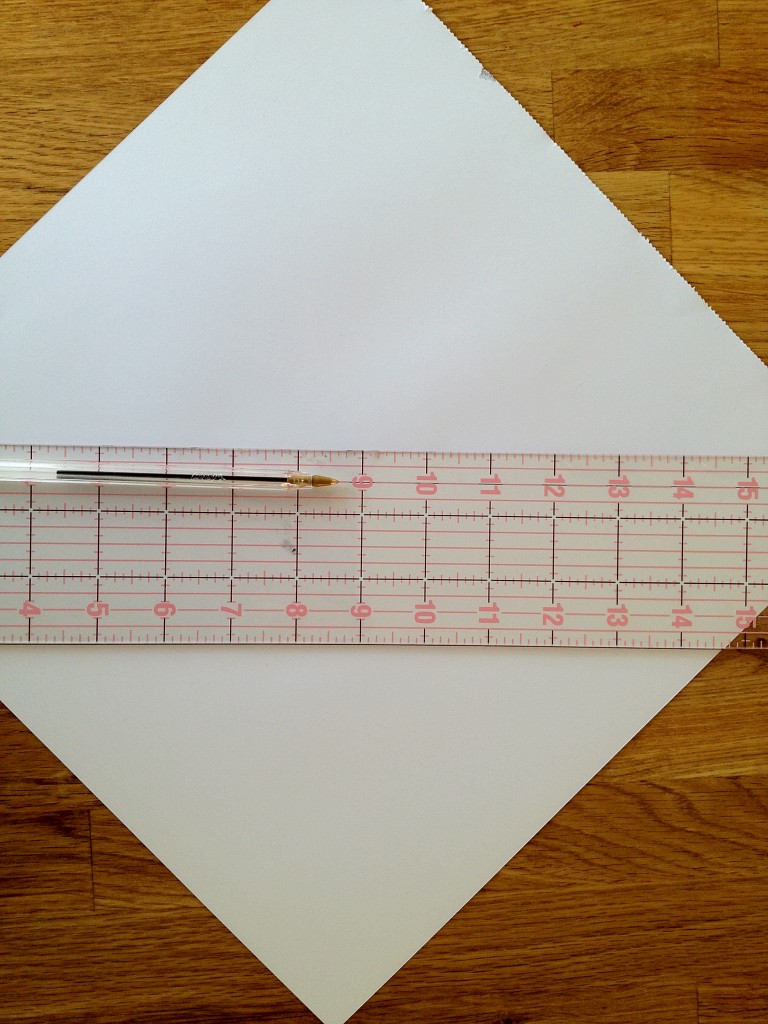
4) The next two lines can be drawn one of two ways: a) you can use the two outer lines, and make lines 3 1/2 inches away, or b) you can use your ruler to draw lines 2 1/2 inches in from the corner, making sure to center the corner so that your line is at a 45-degree angle with the edge of the paper. Yes, I would go ahead and choose option A, but here is a picture of option B
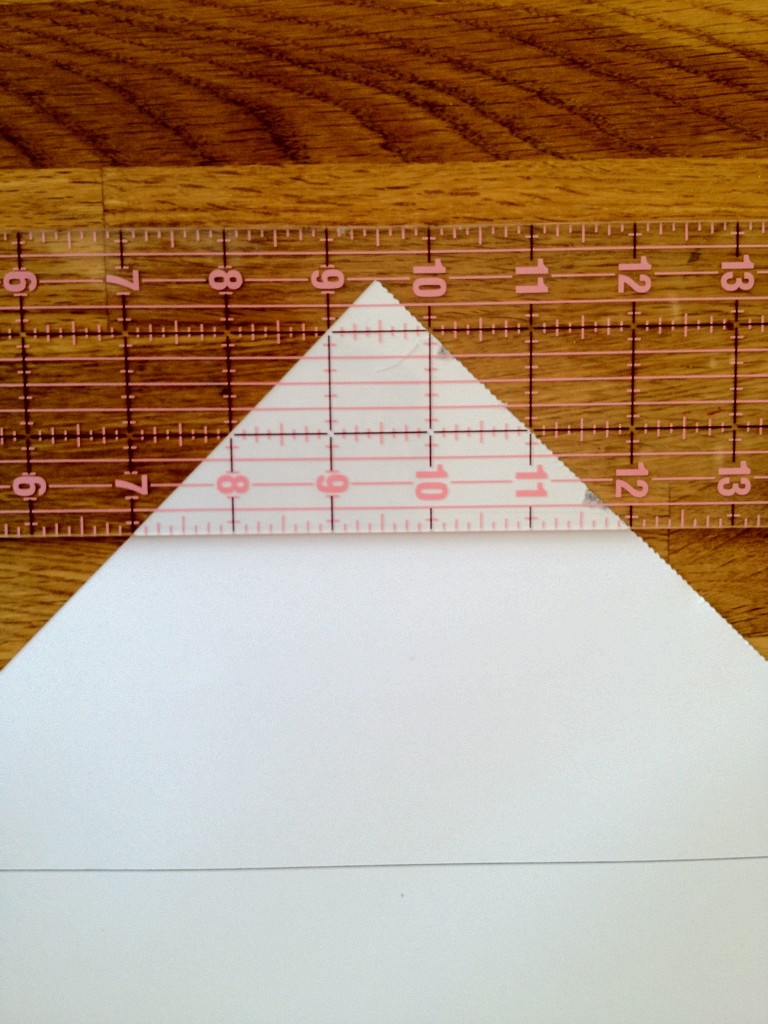
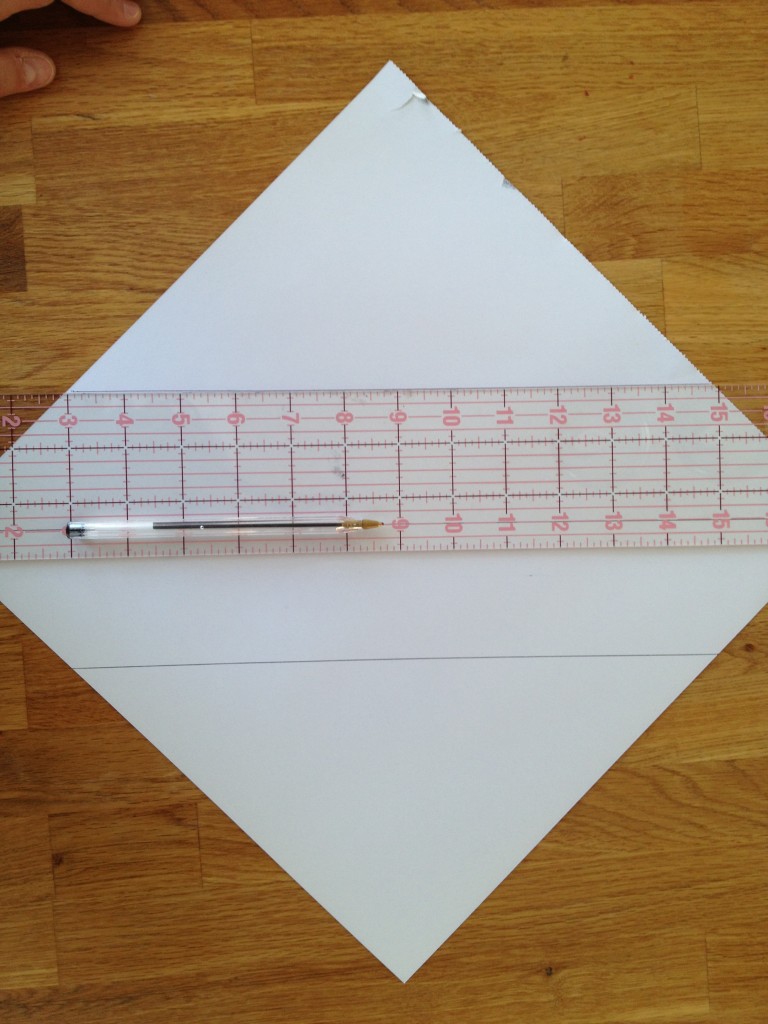
5) Once you have drawn all of your lines, check and make sure you’re lines measure like this picture, with lines drawn at 2 1/2 inches, 6 inches, 8 1/2 inches (midline), 11 inches, and 14.5 inches. These measurements will be different if your paper isn’t exactly 12 x 12.
Once you have completed the paper prep work for all 48 pieces of paper, we can move on to the next step: fabric prep!
Fabric Preparation.
Since I used mostly charm packs for this quilt, I will describe how to use fabric with a 5 x 5 dimension. I will add other dimensions in each step for those who might be using other fabric sizes.
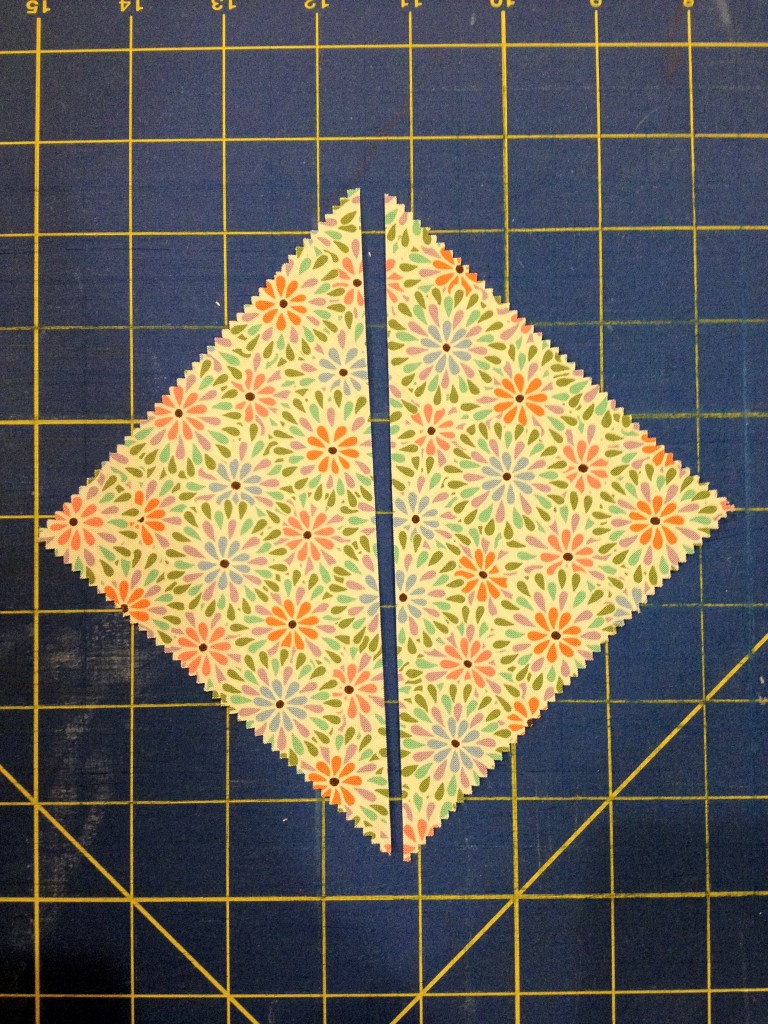
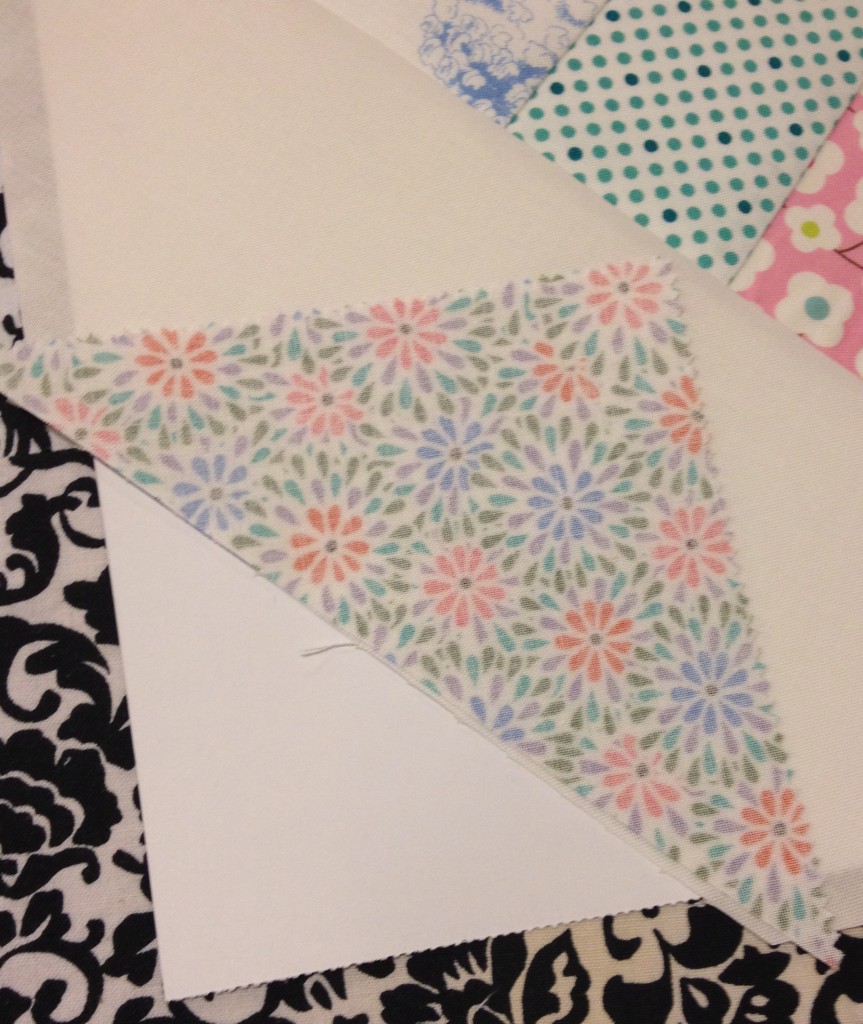
1) Choose 48 charm squares of varying colors, but similar in value (dark, medium, light). If you are using charm squares, you might want to starch your squares a little bit since we will be sewing in the biased edge. Starching the charm will help it maintain its shape and not stretch while sewing. Cut down the center of your charm, from corner to corner. These will be your corner pieces.
If you are using larger cuts of fabric, you can make four triangles from a 7-inch x 7-inch piece of fabric. You will cut from corner to corner, as shown above, and then, with fabric placed together like the original square, cut from the other corner to corner again, crossing at a 90-degree angle through the first cut. This will give you four triangles for the corners, and you won’t need to starch it since the side you will be sewing on will be going with the grain of the fabric. If using this method, you will need 24 7 x 7 squares to make 96 corner triangles.
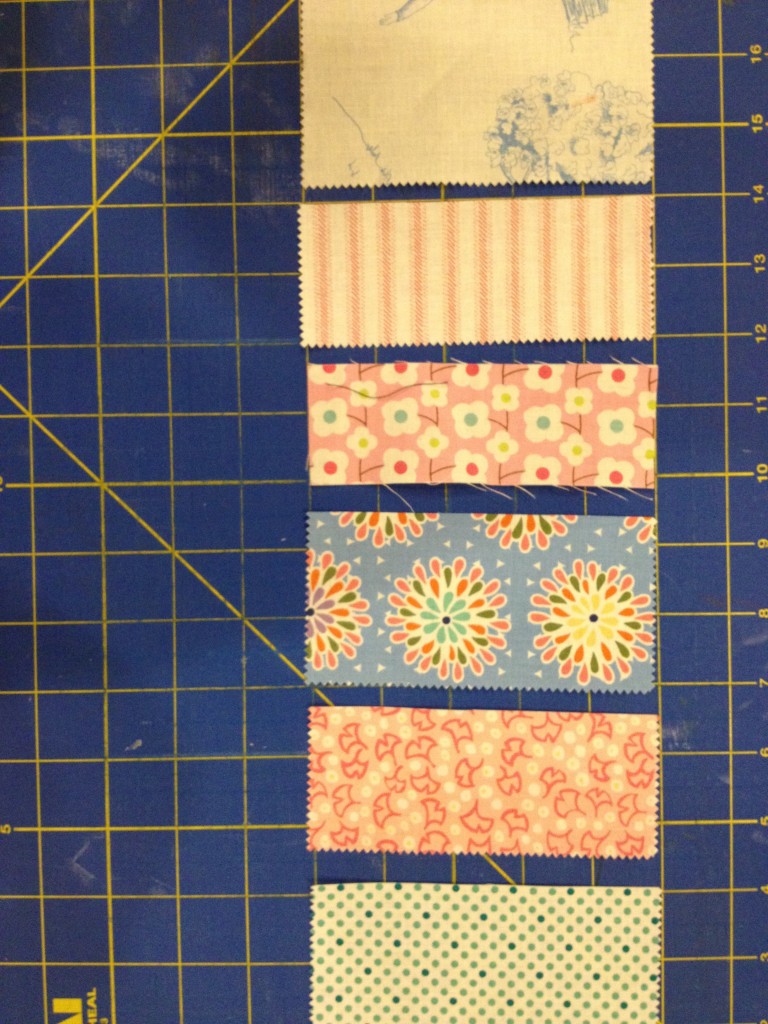
2) Now, we will be cutting our fabric for the string x portion of the quilt. Again, I will be describing how to use charm packs, and in the end, I’ll describe how to use other cuts of fabric.
Using a ruler, measure either 2.5, 2.0, or 1.5 inches away from the edge of the charm and make a cut. If you want a more uniform look, just use 2.5 inches away. If you want a scrappier look, vary your measurements as you please. Each string X portion will need about 4 or 5 charms.
If you are using larger cuts of fabric, you can make four triangles from a 7-inch x 7-inch piece of fabric. You will cut from corner to corner, as shown above, and then, with fabric placed together like the original square, cut from the other corner to corner again, crossing at a 90-degree angle through the first cut. This will give you four triangles for the corners, and you won’t need to starch it since the side you will be sewing on will be going with the grain of the fabric. If using this method, you will need 24 7 x 7 squares to make 96 corner triangles.
2) Now, we will be cutting our fabric for the string x portion of the quilt. Again, I will be describing how to use charm packs, and in the end, I’ll describe how to use other cuts of fabric.
Using a ruler, measure either 2.5, 2.0, or 1.5 inches away from the edge of the charm and make a cut. If you want a more uniform look, just use 2.5 inches away. If you want a scrappier look, vary your measurements as you please. Each string X portion will need about 4 or 5 charms.
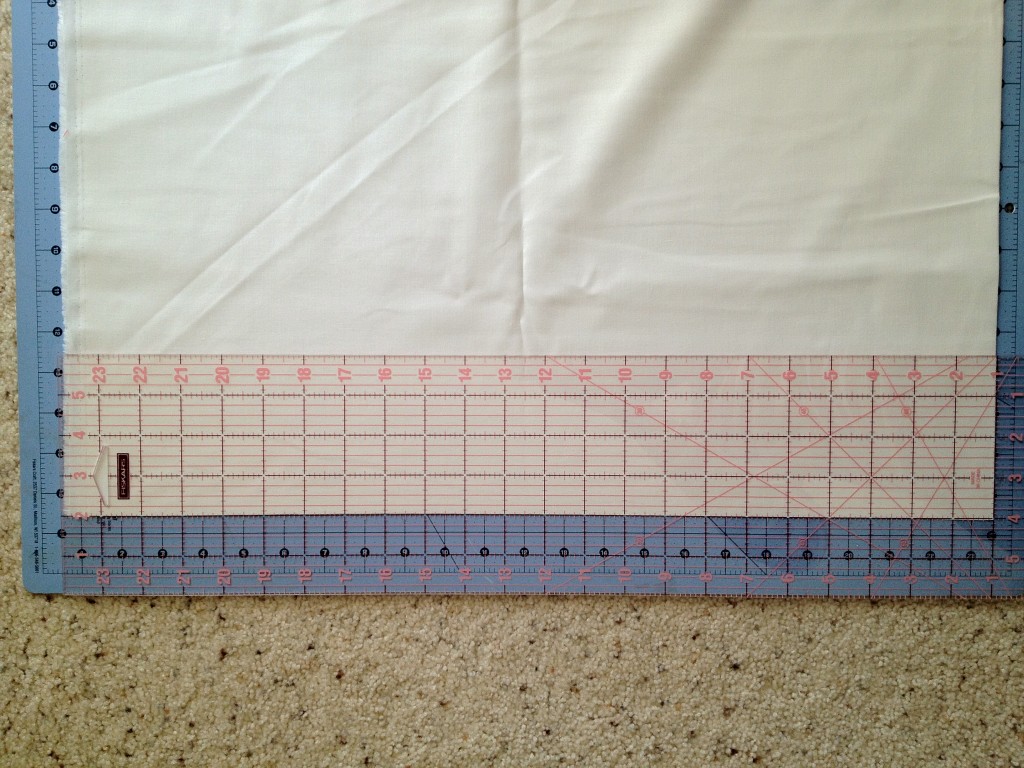
I use the folded fabric to cut my 4-inch strips. Be sure the edge you begin with is a straight edge with the grain of the fabric.
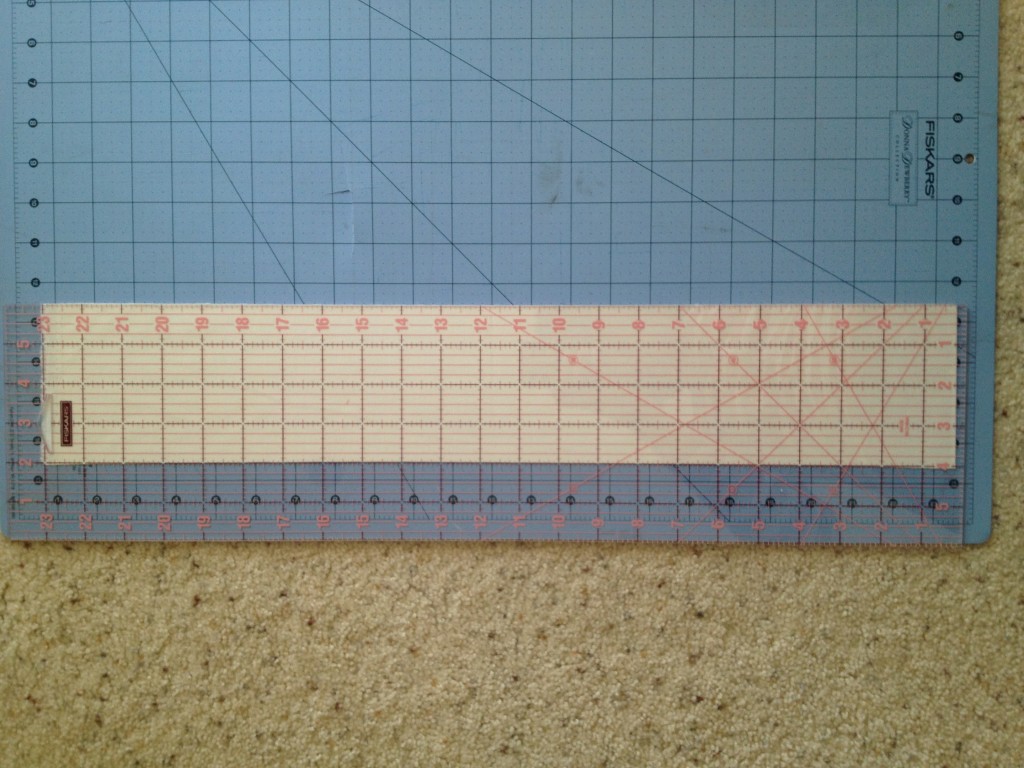
Once you have your strips, open the fabric so you are cutting it into just one layer at a time. Using a ruler with a 45-degree angle line, place the line on the edge of your strip. Cut off the triangle under the ruler.
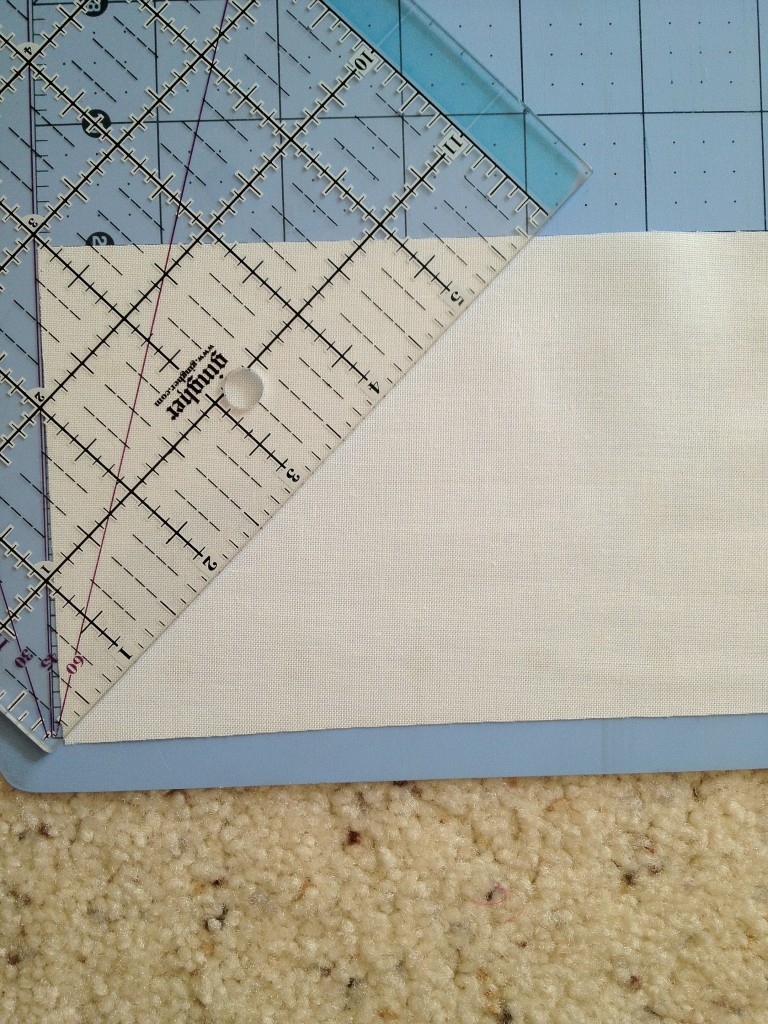
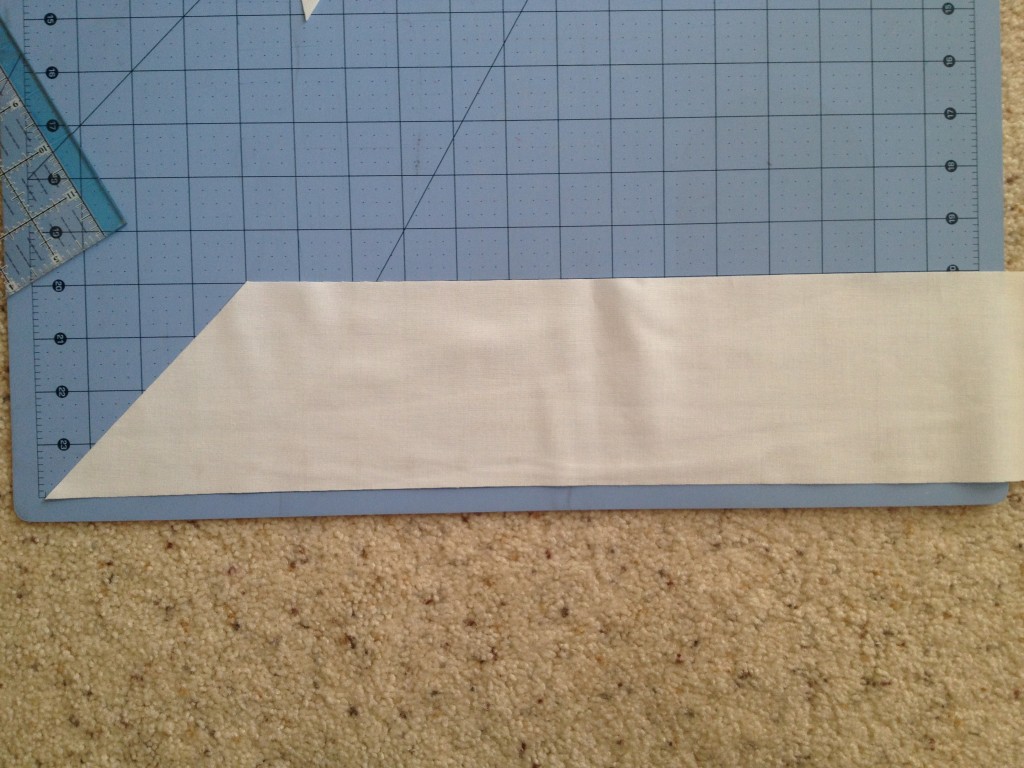
You should now have a corner that is 4 inches above and 4 inches to the side of your bottom corner. From this new top corner, measure 6 inches away. Place the corner of your ruler here and have the 45-degree angle line go straight down. Cut along the ruler’s edge to make a trapezoid. Your resulting trapezoid should be 14 inches wide on the bottom, 6 inches wide on the top.
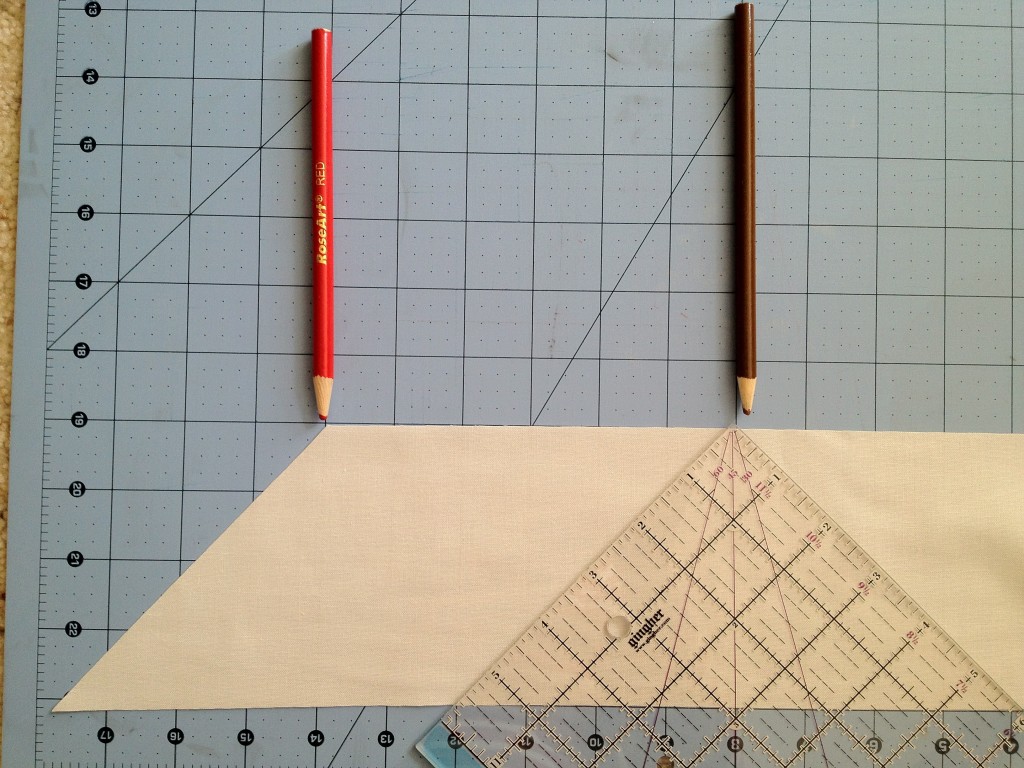
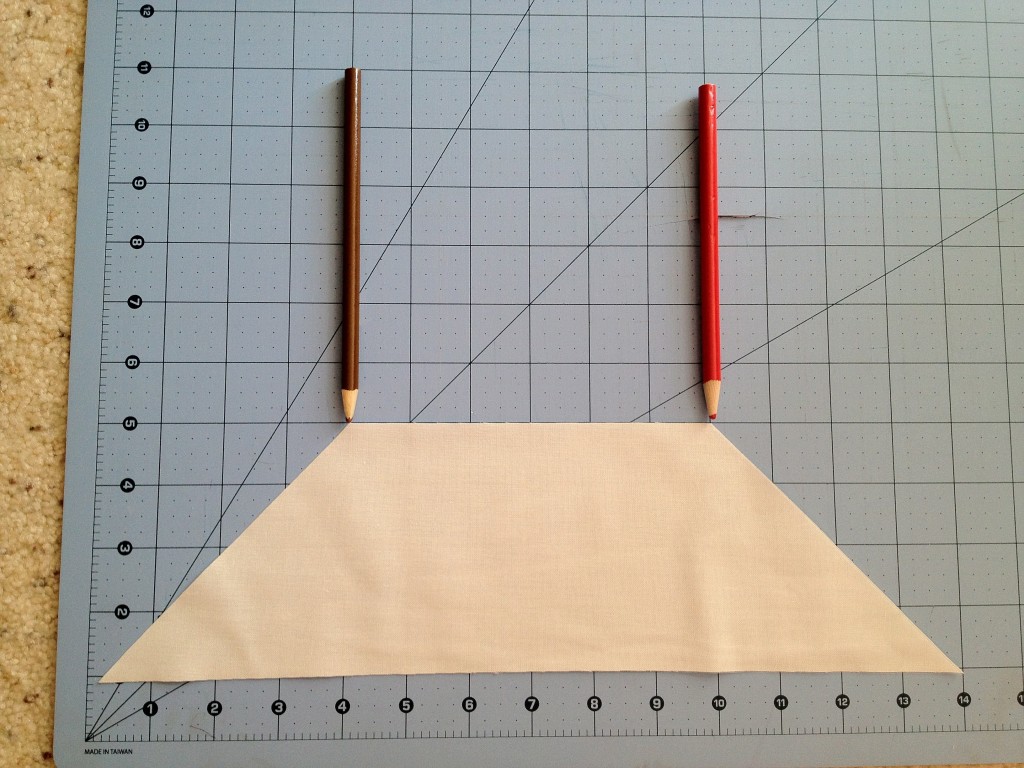
Each 4-inch strip of background fabric should make 4 trapezoids.
Now that we have cut all of our fabric, we should have:
96 corner triangles.
96 background trapezoids
Many many 5 inches wide by 1.5 inches to 3.5 inch wide strips.
Construction:
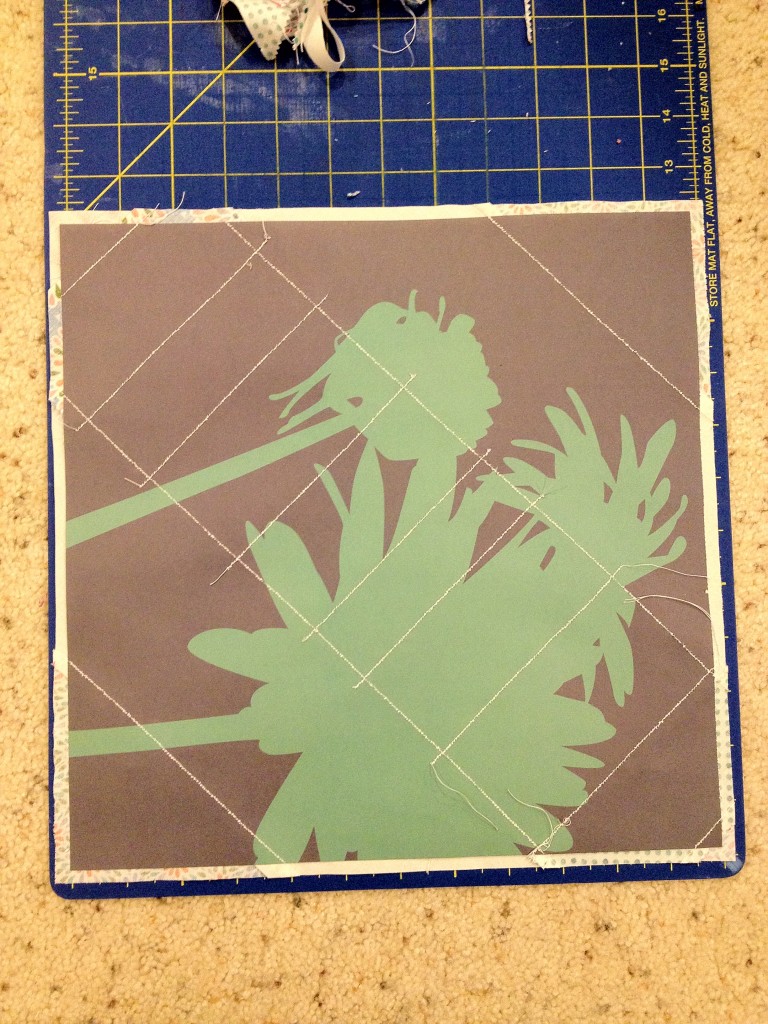
(You can choose to skip steps 1-4 by sewing the strips together first until you have an 18.5-inch long row of 5 inch wide strips, pressing the seams to one side, and then glue the entire block, seams down, to the 12 x 12-inch paper, but this might affect the overall look of the string x portion of the quilt. Then again, it might not, but it is up to you. I will show you how to do it a more precise way, but some people might find this much foundation sewing off-putting ![]()
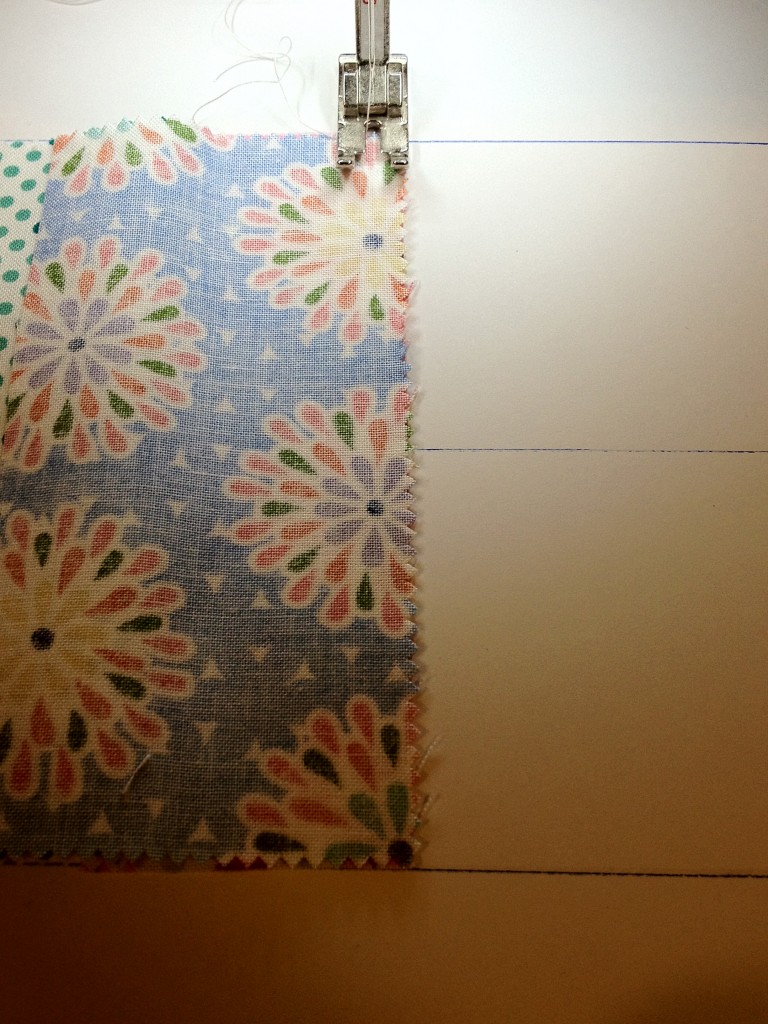
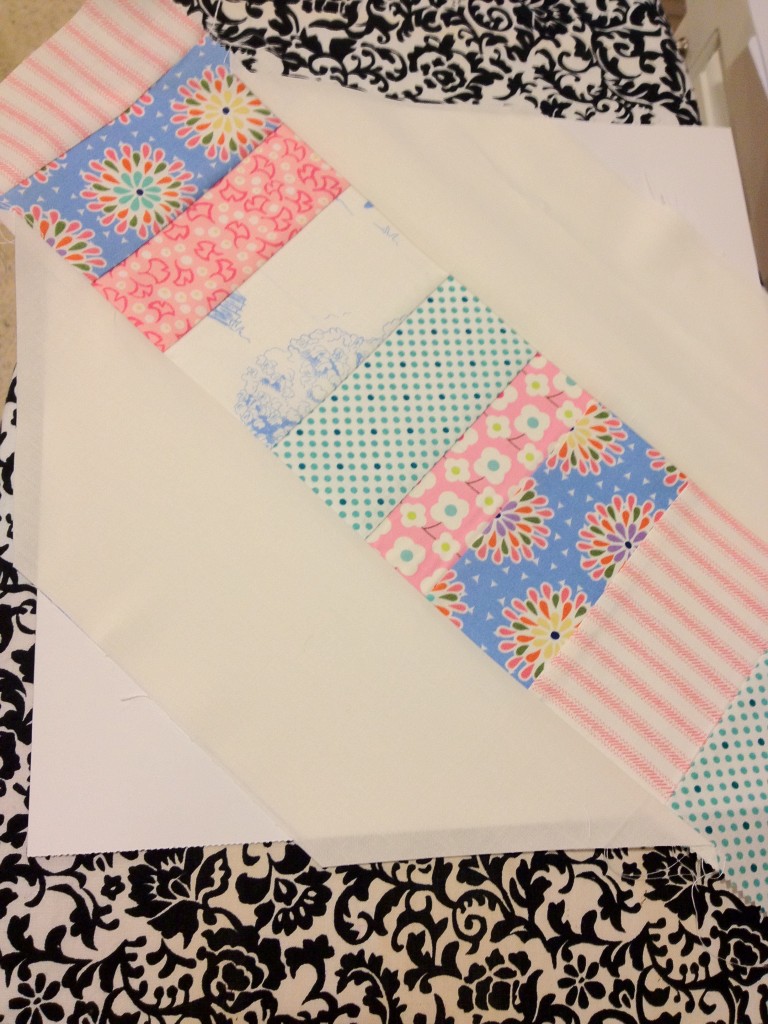
1) Grab your glue stick and a strip of 5-inch long fabric. Glue right side up somewhere in the middle of the paper, making sure the edges are aligned with the pencil markings.
2) Place another 5-inch long strip of fabric on top of the glued strip, right sides together, with one edge flush with the glued fabric. Move your stitch length on your sewing machine to 1.5 mm. Sew over the two strips of fabric and the paper, making sure to have a 1/4 inch seam.
3) Open these and place another 5-inch strip on the other side of the glued strip. Sew as before. Now you should have two strips sewn to either side of the glued strip. Use a hot iron to press these fabrics.
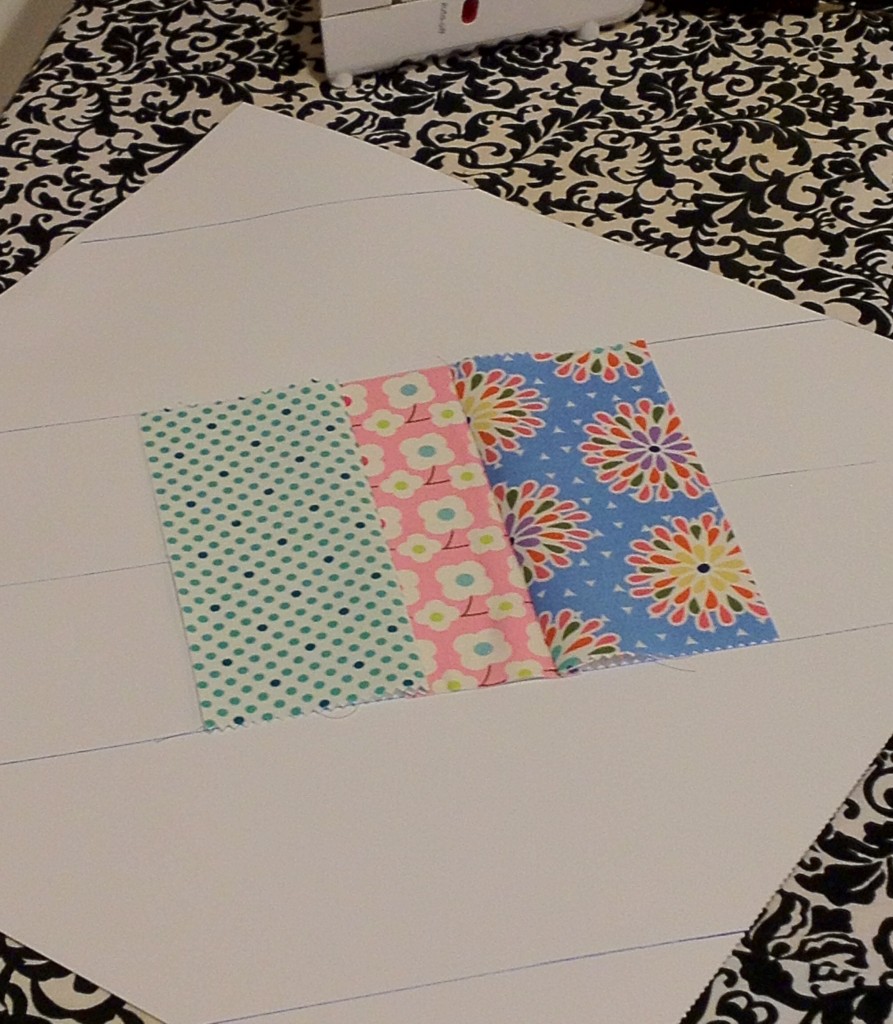
4) Repeat steps 2 and 3, adding on to either end until fabric completely covers 1/4 inch past each corner. Make sure to keep the fabric strips aligned with the drawn lines above and below it. The following pictures show the completion of one string x strip.
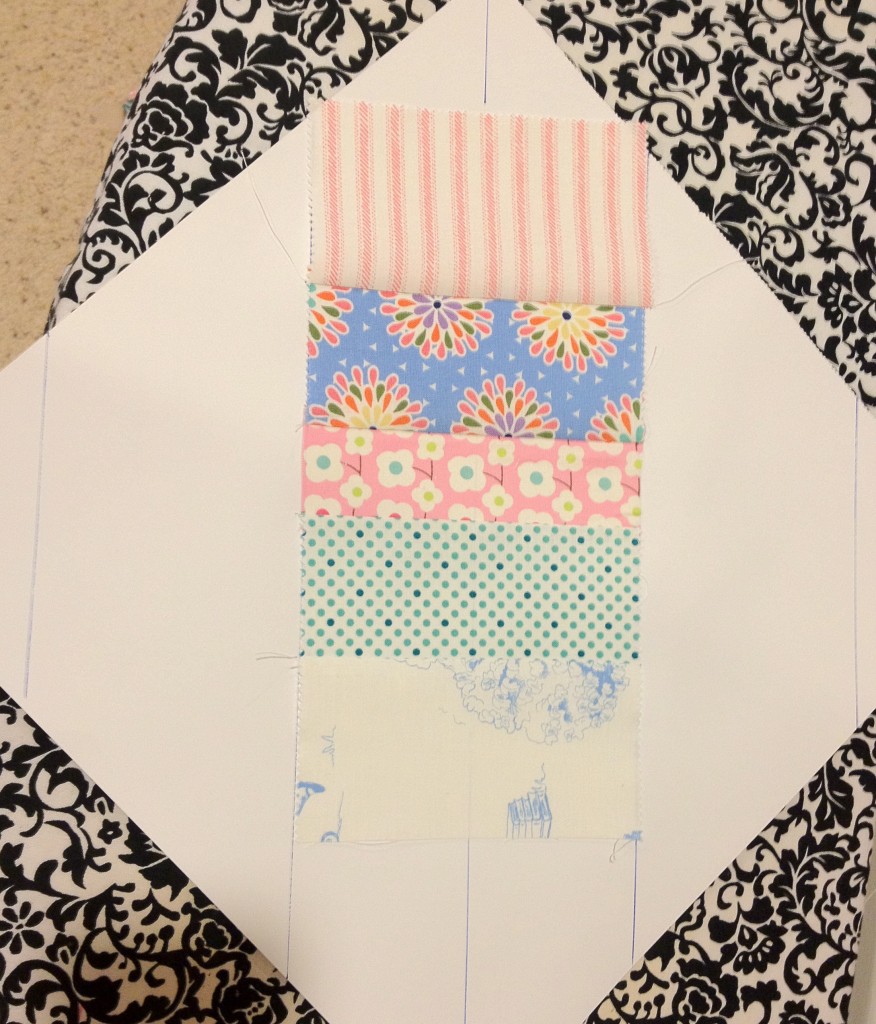
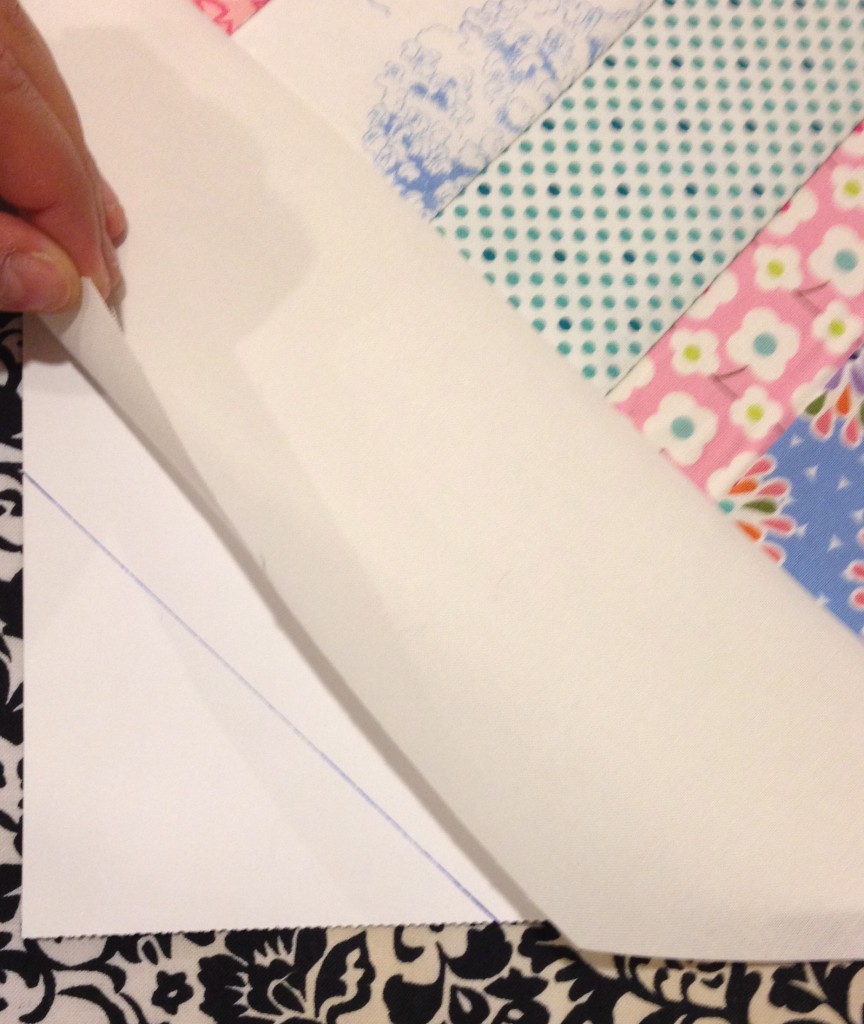
5) At this point, just to remove excess fabric, I cut the strips 1/4 inch away from the edges of the paper. You can choose to do the same, or not.
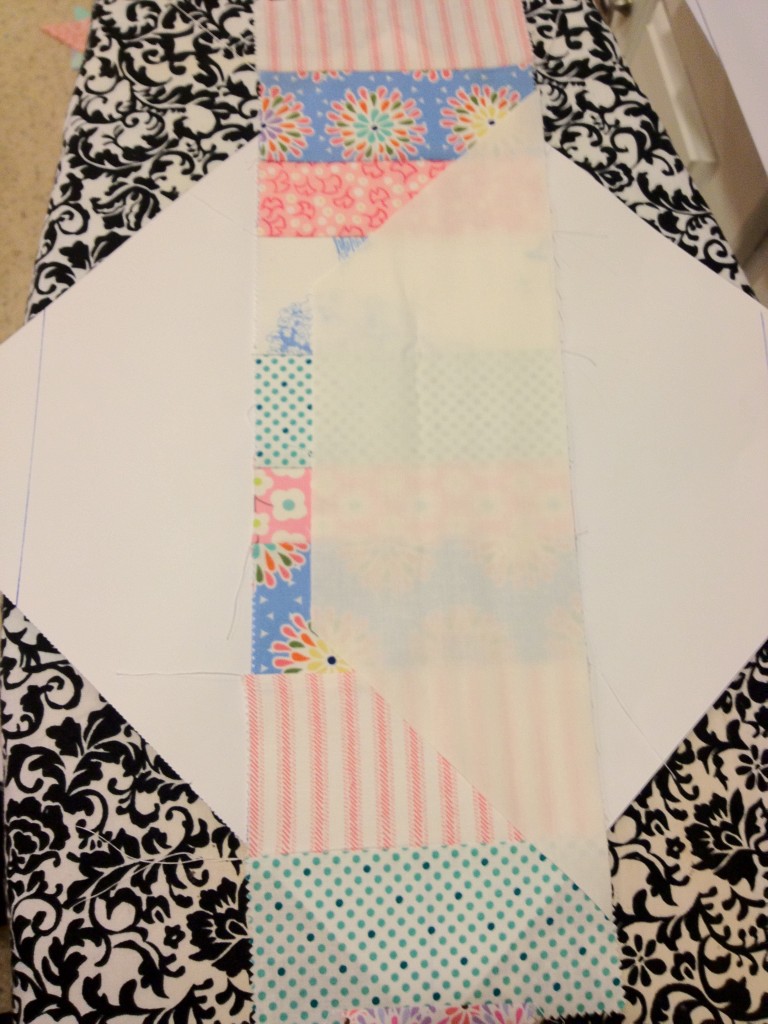
6) Now is the time to add our trapezoids/background to the block. Match the long edge of the trapezoid/background fabric with the marked line, matching the right sides of fabric together with the string x strip. Again, these lines are not sewing lines, but rather fabric placement lines. Once the fabric is lined up, sew 1/4 inch away from the line. Do this to both sides of the string x strips.
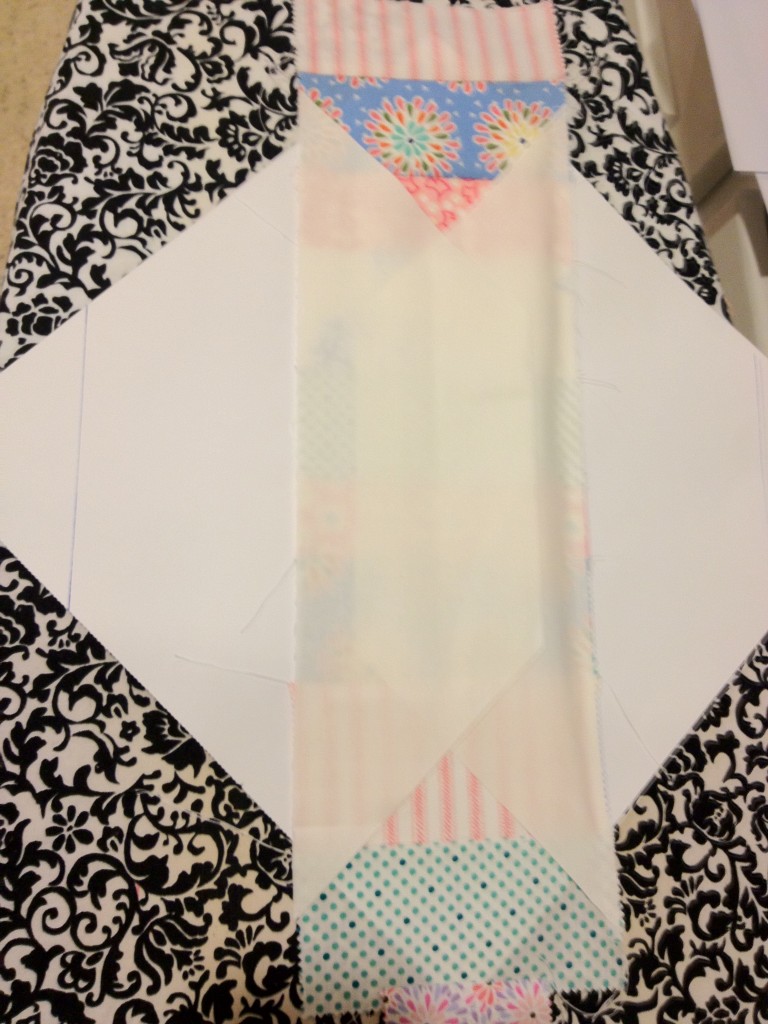
7) Press the background fabric flat on both sides.
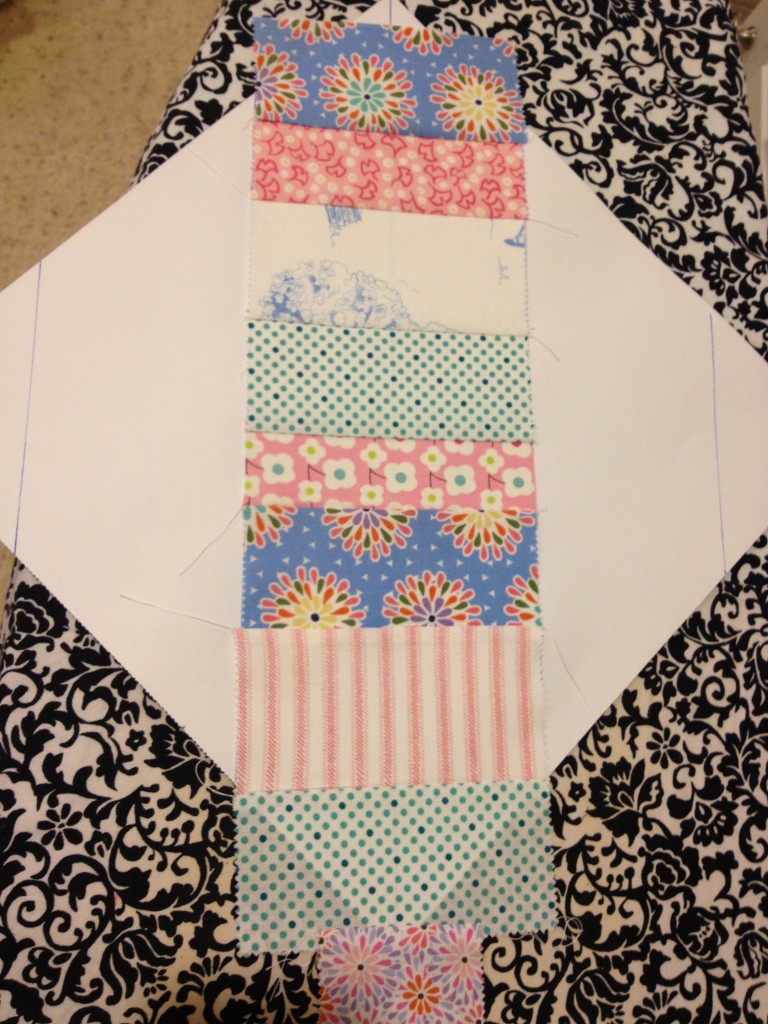
At this point, the corner lines might be covered up with your background fabric. If it is, it is OK, but just remember that you’ll need these lines to sew your next piece to the block.
Using the line as your guide, center the corner triangles, right side down, on top of the background fabric, with the long edge aligned with the drawn corner line. Sew 1/4 inch away from the line and fabric edge. Do that for both corners of each block.
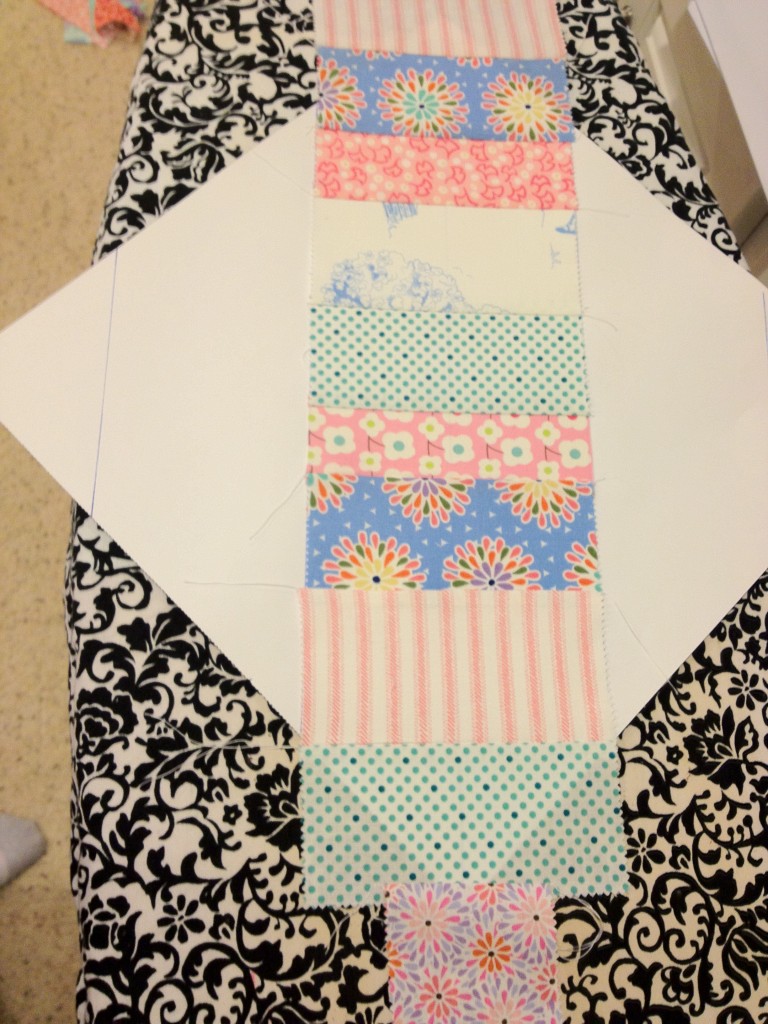
9) Press these triangles to the side. Sewing your blocks is now complete.
10) Trim your block. Here is where you have to decide how big you want your resulting quilt to be. If you trim your blocks flush with the paper, then you will end up with a quilt top of 69 x 92 inches. A normal twin-size quilt is 64 x 88. So, you think this would be larger than that, but after quilting and washing, this will probably shrink to exactly 64 x 88, but it might be even smaller. So, I chose to cut my blocks 1/4 inch away from the edge of the paper. This ends up making a 72 x 96-inch quilt top. After quilting and washing, my quilt was 68 inches by 89 inches. So, I recommend you cut your blocks 1/4 inch away from the paper, making a 12.5-inch block.
11) From here, arrange you blocks how you want them.
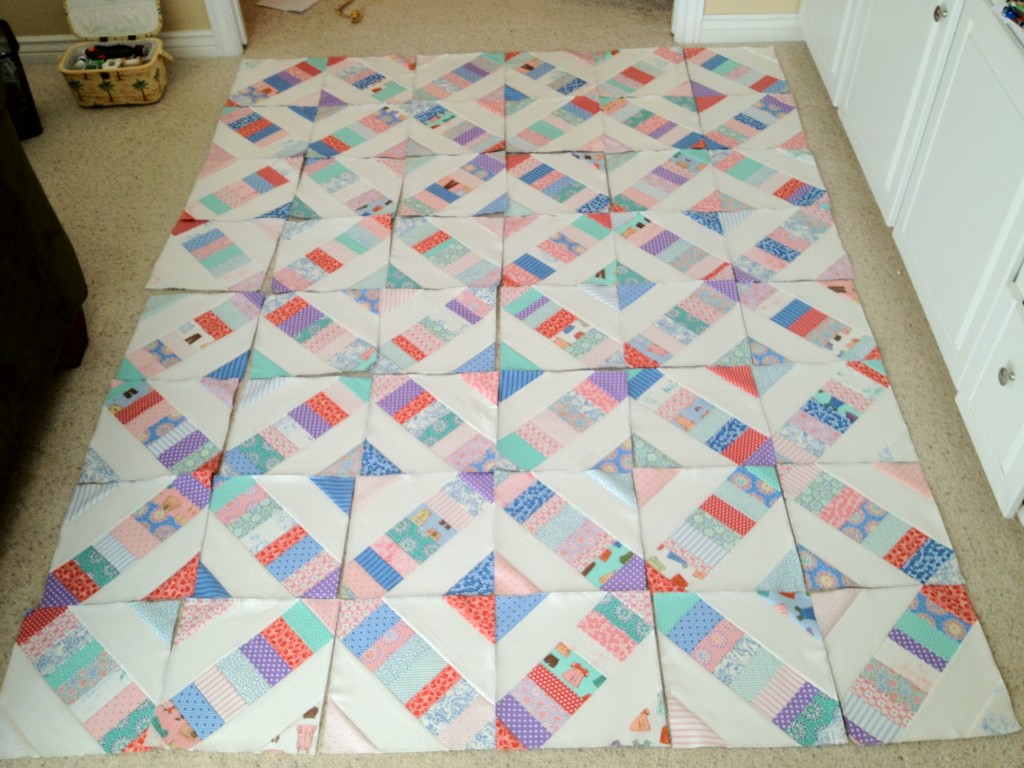
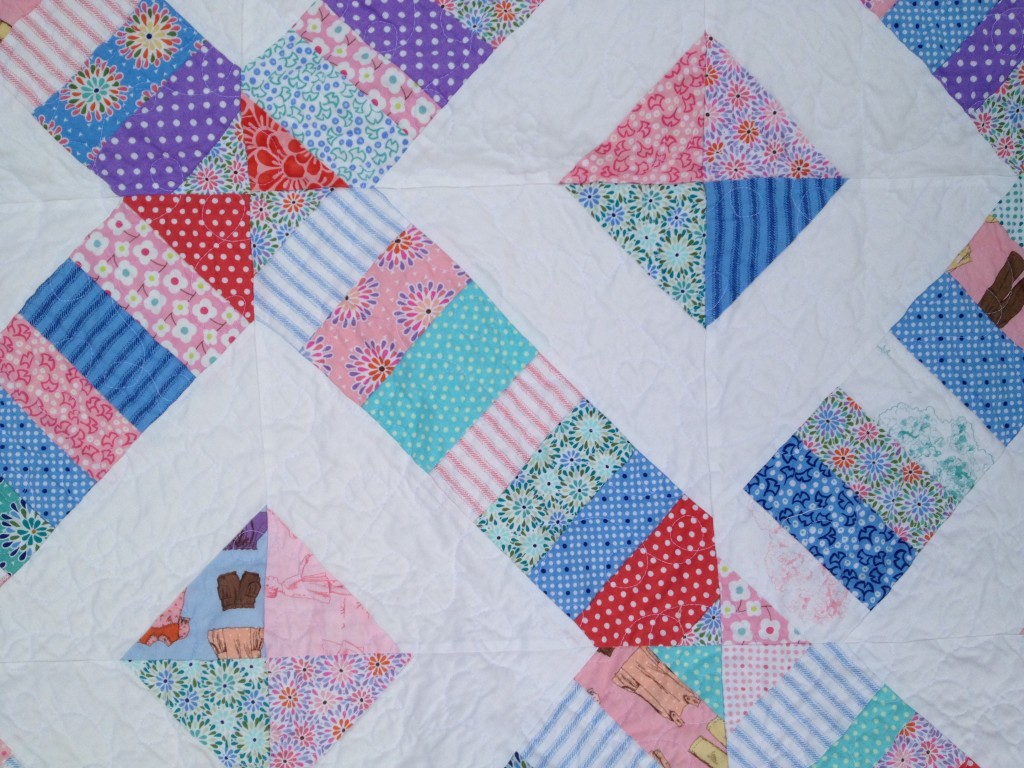
My main goal here was to have the fabrics spread evenly throughout the quilt and do not have the same fabrics next to each other in the diamonds. I would label the paper on the back of each block by row and column, for example, 1a, 1b, 1c, 1d, 1e, 1f, then 2a, 2b, 2c, etc. I would sew a row together, even with the paper still attached. Once the rows were together, I would rip the paper off, making sure I still knew which row was which, and which direction was up and down, right and left. (I normally put rip off the label of 1a, 2a, 3a, 4a, etc., and pin it to the top left-hand corner of that row.) Press the seams in alternating directions. I sew my odd rows away from the label, and my even rows toward the label. Then, pinning corners together, I sew the rows together. Press the seams to one side, and your quilt top is done!
ad a great time making this quilt. If you use this tutorial, please let me know. Also, let me know if there is anything I need to do to change it. Thanks for visiting!
Leave a comment
You must be logged in to post a comment.